
Using Adobe Target in an Angular application
Adobe Target is a tool that can be used to implement A/B and multivariate tests on websites and apps. The goal of these tests is to measure what variation of the content performs better, e.g. leads to better sales or a better customer experience.
Implementing a test is a rather simple process. Login to Target setup a new activity and enter the url of the page you want to test. Select the area where the test should be run and configure the logic behind it. Then, with the click of a button, the test can be activated on the live environment.
The technical challenge of SPAs
Running a test on a static website is quite simple. The HTML markup is always the same, Adobe targets wait until the page is loaded and then replace part of the page with its test content. However, doing this on a very dynamic page like a Single Page Application is more difficult.
Both the SPA framework and Adobe Target manipulate the DOM, leading to race conditions. For example, if Target replaces part of the Dom but the framework was still loading the page, the changes may not be visible anymore. Or the other way around; if the page is not fully loaded yet, Target might not find the content it is wanting to replace.
In this post we’ll describe how to implement Target on an Angular application. Angular is one of the leading frontend frameworks at this moment. Key is that Angular signals Target when the page is loaded and thus ready to be targeted.
Step 1: Loading the AT.js library
Adobe distributes its code as a JavaScript library; AT.js. It can be downloaded via the Administration -> Implementation page in Target. There are different versions of this library, for SPA support make sure you have a 2.x version. Older ones (including the legacy mbox.js library) do not support SPAs.
The standard way of implementing Target is by including the file via a script tag on the page. In Angular, however, 3rd party scripts can be loaded via the “scripts” element in the angular.json file. Add it like this:
"scripts": [
 "src/js/at.js"
 ]
Step 2: Setting the Adobe Target account id
Every Adobe Target user has a unique account id, so Target knows what logic to apply. This id is configured via a so-called property. You can find it in Target in the Administration -> Properties screen.
function targetPageParams() {
  return {
    "at_property": "00000000-0000-0000-0000-00000000000"
  };
}
Add this piece of code at the top of your at.js file, since it should be defined before the AT library itself is loaded.
Step 3: Signaling Target when to act
This step is where the real magic happens. Adobe Target needs to know when Angular is done manipulating the DOM. Also, we pass the name of the current view (or page), so specific target rules for this view can be applied.
Adobe provides an example function for this, that extracts the page name from the hash:
function targetView() {
  var viewName = window.location.hash;
  // or use window.location.pathName if router works
  // on path and not hash

  viewName = viewName || 'home'; // view name cannot be empty
  // Sanitize viewName to get rid of any trailing symbols
  // derived from URL
  if (viewName.startsWith('#') || viewName.startsWith('/')) {
    viewName = viewName.substr(1);
  }
  // Validate if the Target Libraries are available on your website
  if (typeof adobe != 'undefined' && adobe.target
      && typeof adobe.target.triggerView === 'function') {
    adobe.target.triggerat_propertyView(viewName);
  }
}
Define it in your application. One possible way to do this is to add it to the at.js file as well.
Next, it needs to be called from your application. Every time a page is loaded. The trick is to subscribe to the events the router emits:
router.events.subscribe((val) => {
  if (val instanceof NavigationEnd) {
    targetView();
  }
});
Angular will complain it doesn’t know the targetView method because its definded in the ‘external’ .js file. Declare it in your Angular class like this to solve that:
declare const targetView: any;Step 4: Start testing
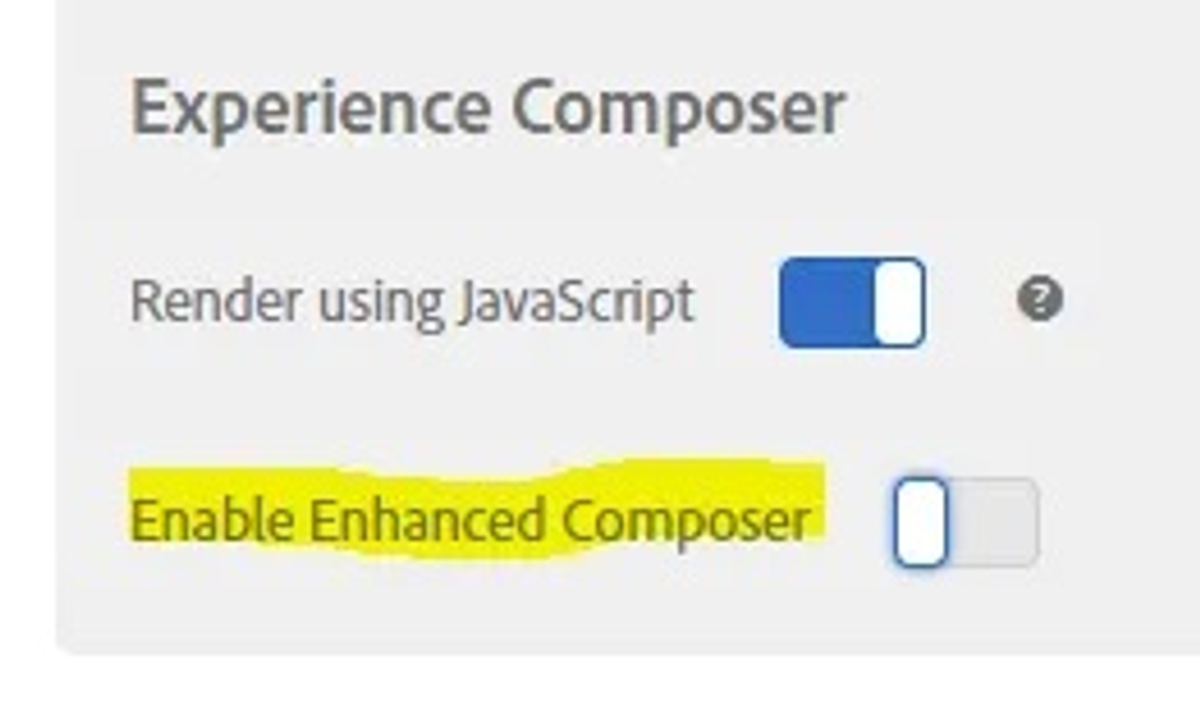
Now all the technical changes are prepared, it’s time to start testing. Go to Adobe Target and setup a new activity. Enter the url of your app. Once you are in the VEC (Virtual Experience Composer) it will fail to load the app. To solve that, finish the creation wizard and click Configure -> Page delivery. Now make sure the toggle “Enable Enhanced Composer” is in the OFF position.
Once you enter the composer again and go through the app (use the preview mode) you will see the names of the view appear on the right. Per view, it’s possible to define alternative content.
Conclusion
That’s it! Enjoy your Angular targeting experience, and feel free to contact us if you have any additional questions on Adobe Target or any other product from the Adobe Experience Cloud.
[
](https://www.eventbrite.be/e/adobe-afterglow-the-age-of-generative-ai-tickets-876615629947?utm-campaign=social&utm-content=attendeeshare&utm-medium=discovery&utm-term=listing&utm-source=cp&aff=ebdsshcopyurl)
Ready to take your next step?
Our sales team is always ready to discuss a challenge you are currently struggling with and see how we can help you come up with a solution. We have an in-depth knowledge and years of experience with the Adobe platforms so get in touch and we'll happily help you build a more scaleable, adaptable and personalised experience for your customers.
